This guide provides detailed steps for setting up a Raspberry Pi 5 NVMe NAS using openmediavault (OMV) with quad-NVMe storage, utilizing both terminal and GUI methods. It includes creating a parent file directory with sub-filesystem directories, configuring ZFS settings (like ashift, compression, and record size), and mapping the setup to a Windows device for optimal functionality. Additional steps for system optimization and maintenance are also included to ensure a seamless experience.
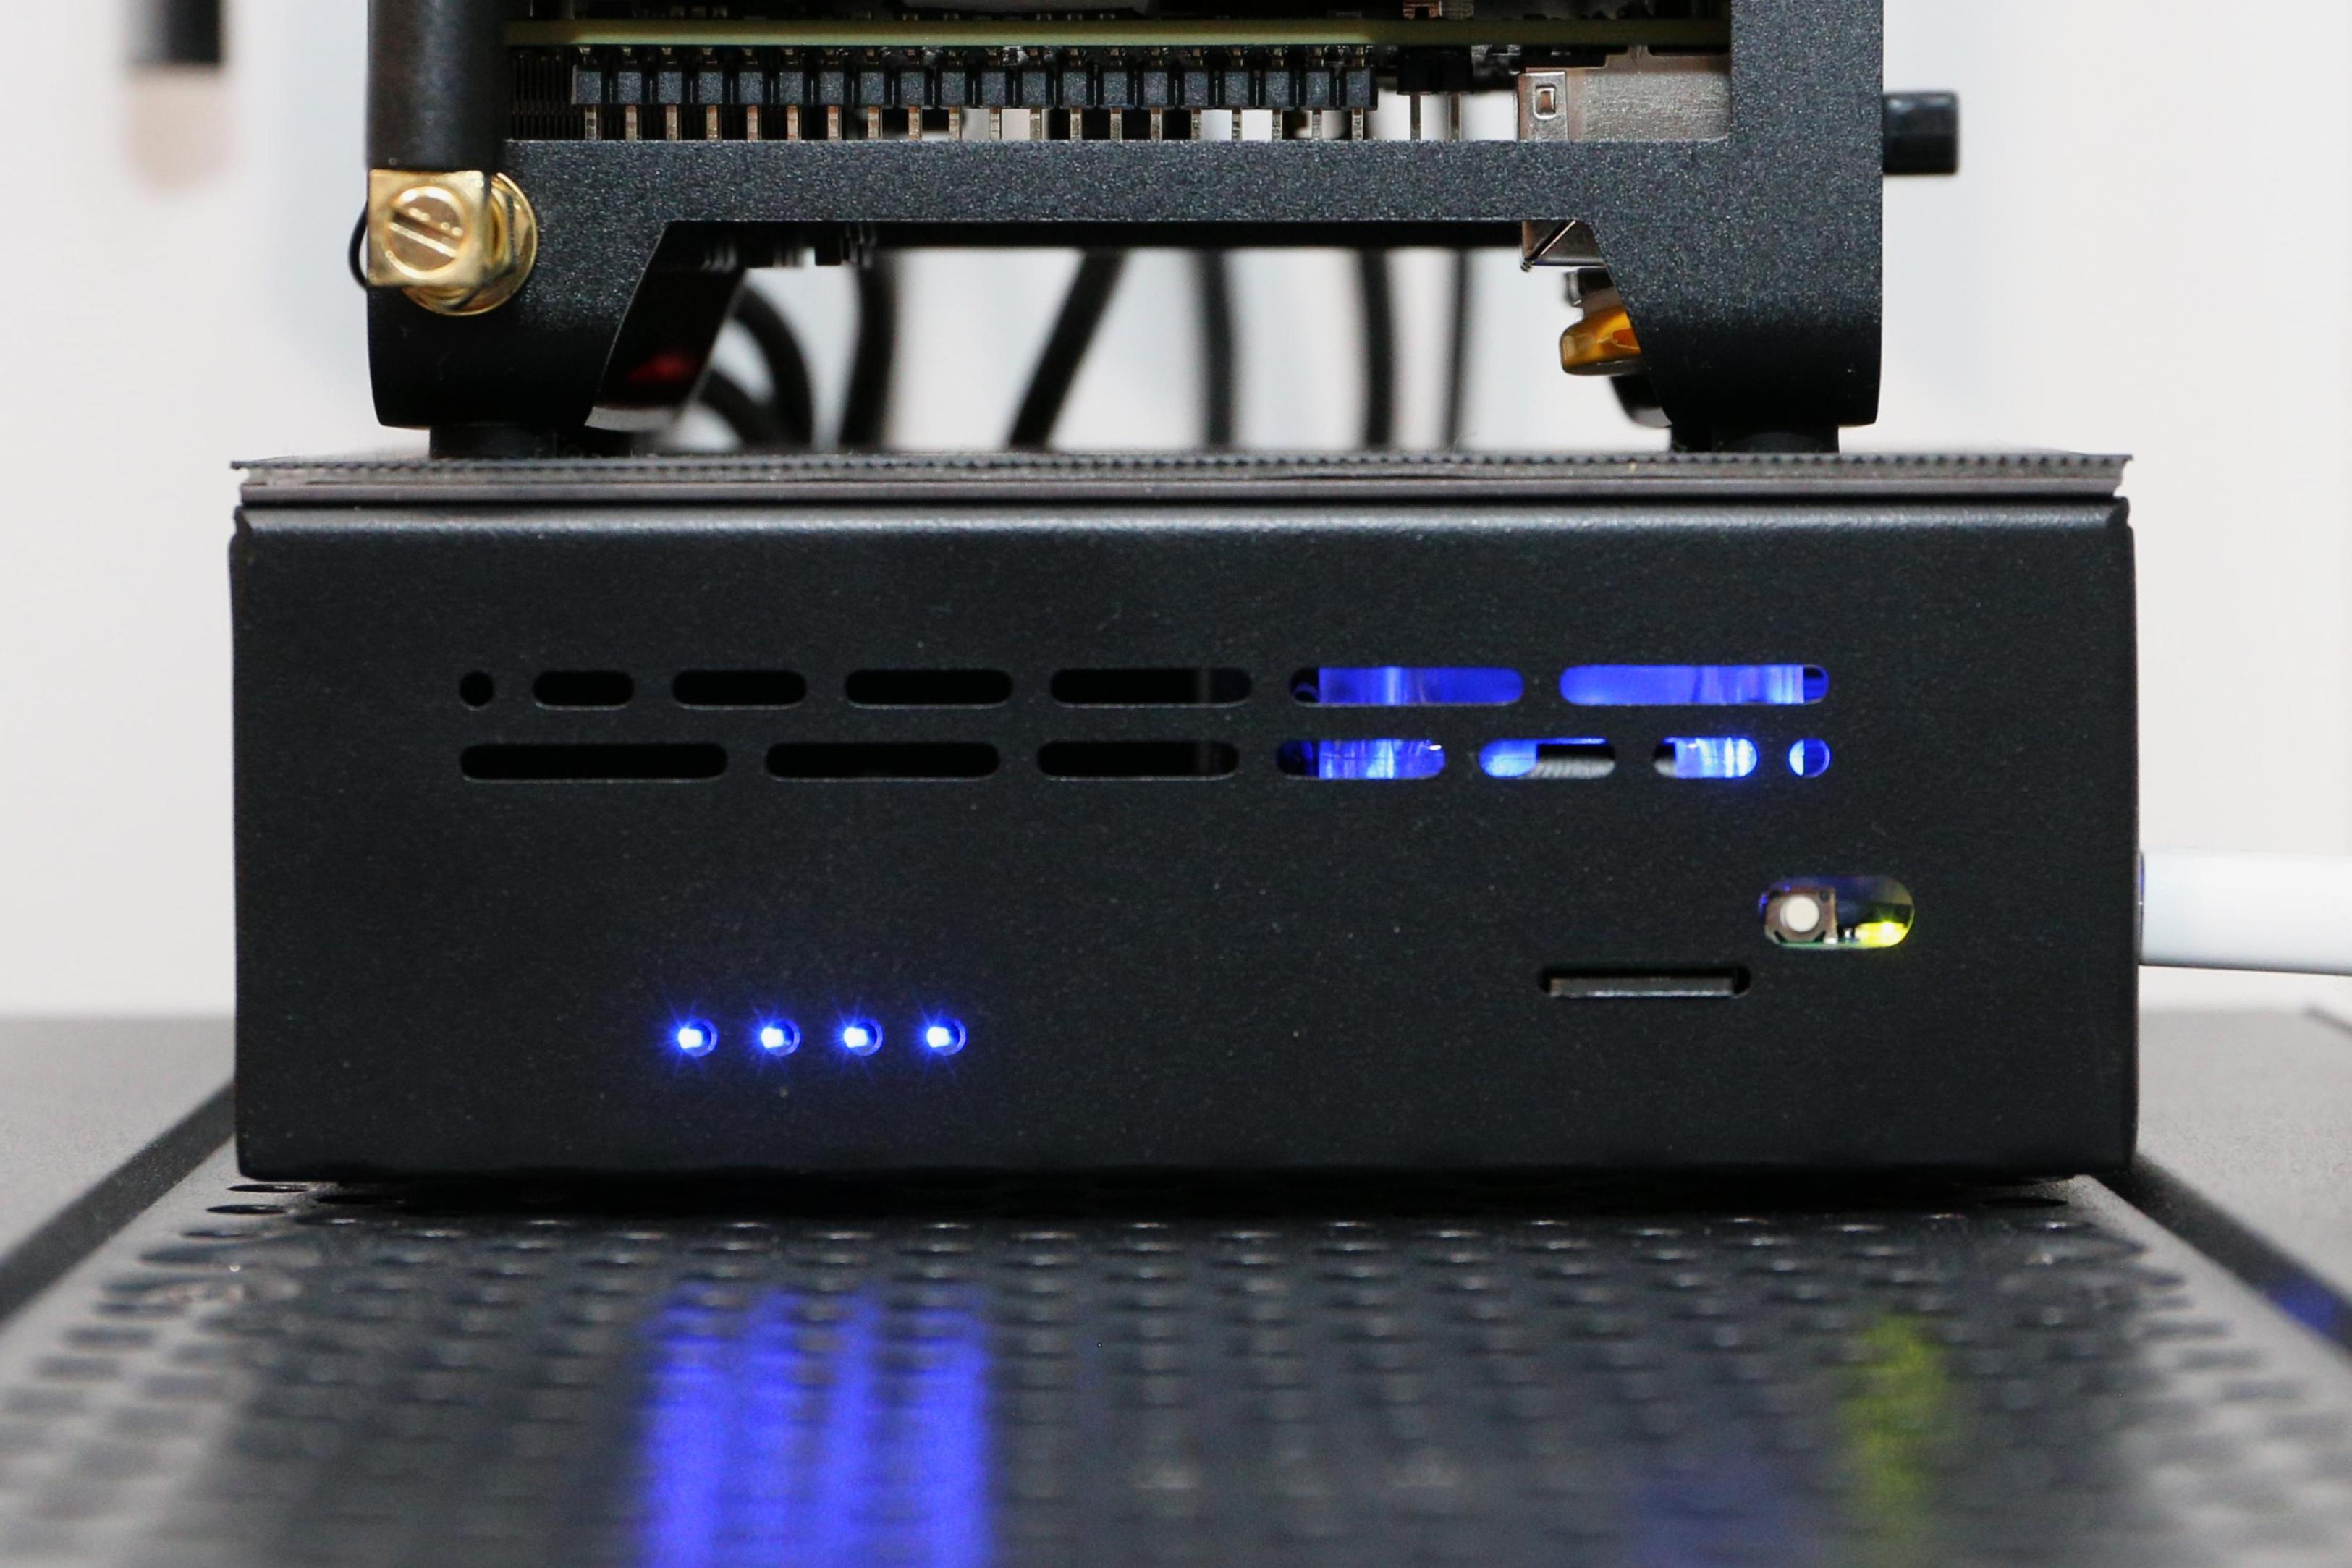
This guide assumes that you have the hardware sorted out and and are looking to setup the software end of the system for 24-7 usage. The hardware guide for setting up the Raspberry Pi 5 NVMe NAS will be updated soon (Link to be updated).

1. Setting Up OMV
1.1 Install Raspberry Pi OS Lite
- Download the latest Raspberry Pi OS Lite and flash it to an SD card using Raspberry Pi Imager.
- Boot the Raspberry Pi 5 and log in using default credentials:
- Username:
pi - Password:
raspberry
- Username:
1.2 Configure Initial Settings if using Wi-Fi
- Connect to Wi-Fi:
sudo raspi-config- Navigate to Network Options > Wi-Fi and connect to your network.
- Go to Localisation Options and set (in our case its Singapore):
- Locale:
en_SG.UTF-8 - Timezone: Asia/Singapore
- WLAN Country: Singapore (SG)
- Locale:
- Navigate to System Options > Boot / Auto Login:
- Select: Console Autologin (so that we can run the system headless)
- Finish and reboot the system
- Update System:
sudo apt update && sudo apt upgrade -y - Get the IP address of the system:
hostname -I Example Output: 192.168.0.240 - SSH into the system using another device with your username, IP address and password (accept connecting and fingerprints if prompted):
ssh <LOGIN_NAME>@<RASPBERRY_PI_IP>

Example:
ssh rpi5@192.168.0.240
1.3 Install OpenMediaVault (OMV)
- Download and execute the OMV installation script:
wget -O - https://github.com/OpenMediaVault-Plugin-Developers/installScript/raw/master/install | sudo bash - Configure WiFi using OMV’s network manager:
sudo omv-firstaid- Navigate to Configure Network interface > wLan0 and configure IPv4 WiFi. Leave IPv6 disabled.
- Go to Configure Time Zone and set it to your local time zone (in our case its Singapore):
- Get the updated IP address and SSH back into the system to continue OMV setup
- Log in to the OMV Web GUI:
- Access via IP address: (e.g.,
192.168.0.240) - Default credentials:
- Username:
admin - Password:
openmediavault
- Username:
- Access via IP address: (e.g.,
1.4 Set Static IP within OMV
- In the OMV web GUI menu:
- Navigate to > Network > Interfaces.
- Select your Ethernet or Wi-Fi interface and edit its configuration.
- Set a Static IPv4 Address (e.g.,
192.168.0.242) and Subnet Mask (e.g.,255.255.255.0). - Add your router’s IP as the Gateway and DNS Server
- Gateway : (e.g.,
192.168.0.1) - DNS Server: 8.8.8.8 or 8.8.4.4 (Google / Cloudflare)
- Gateway : (e.g.,
- Verify the static IP assignment:
hostname -I
ip addr
1.5 Enable OMV Extras and ZFS Plugin
- Enable OMV Extras:
- Go to Plugins and install
openmediavault-omvextrasorgif its not already installed.
- Go to Plugins and install
- Search for and install:
openmediavault-zfs: This is the ZFS module for OMVopenmediavault-compose: Adds Docker Compose functionality for advanced containers.openmediavault-flashmemory : Preserves the SD card’s lifespan by reducing writes.-
openmediavault-sharerootfs: Allows root filesystem sharing.
- Enable Flash Memory Plugin
- After installing
openmediavault-flashmemory, navigate to Services > Flash Memory. - Enable the service and apply changes.
- After installing
2. Creating the ZFS Pool and Filesystem Structure
2.1 Prepare NVMe Drives
- List all drives to ensure they’re recognized:
lsblk -o NAME,SIZE,MODEL,SERIAL - Clear existing ZFS metadata and partitions:
sudo zpool labelclear -f /dev/nvme0n1sudo zpool labelclear -f /dev/nvme1n1sudo zpool labelclear -f /dev/nvme2n1sudo zpool labelclear -f /dev/nvme3n1 - (Optional) Wipe drive signatures:
sudo wipefs -a /dev/nvme0n1
sudo wipefs -a /dev/nvme1n1
sudo wipefs -a /dev/nvme2n1
sudo wipefs -a /dev/nvme3n1
2.2 Create ZFS Pool
- Create the pool with RAID-Z1 for redundancy and set
ashift=12for optimal performance with NVMe drives:sudo zpool create -o ashift=12 zfspool raidz1 /dev/nvme0n1 /dev/nvme1n1 /dev/nvme2n1 /dev/nvme3n1 - Enable compression for the pool:
sudo zfs set compression=lz4 zfspool - Disable
atimefor reduced writes (helps increase NVMe Lifespan):sudo zfs set atime=off zfspool - Verify pool creation:
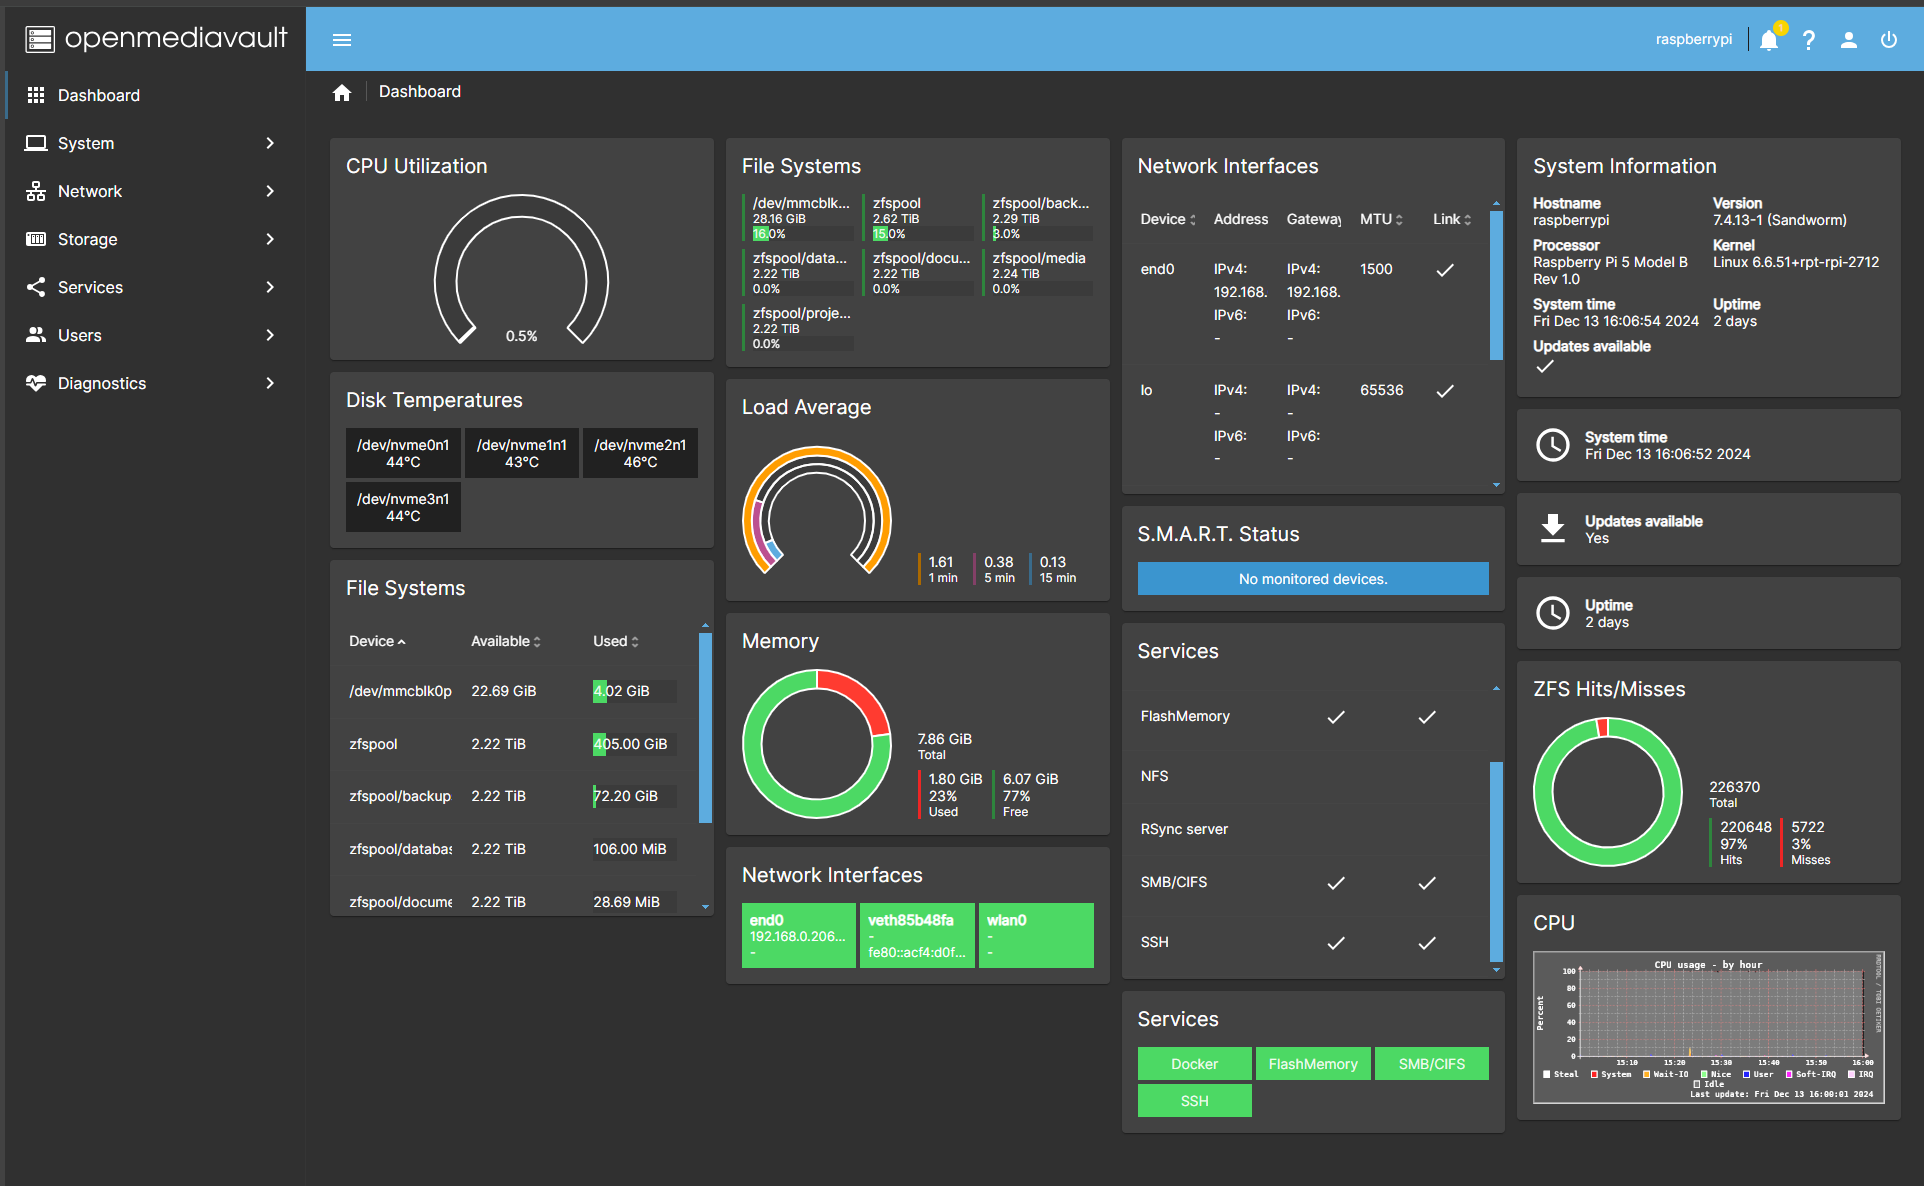
sudo zpool status
sudo zfs get compression
2.3 Create Filesystem Structure
- Create sub-filesystems as required (child datasets):
sudo zfs create mnt/zfspool/documents sudo zfs create mnt/zfspool/media sudo zfs create mnt/zfspool/backups sudo zfs create mnt/zfspool/projects - Customize specific filesystem properties:
- Set
recordsize=1Mformedia(optimal for large files):sudo zfs set recordsize=1M mnt/zfspool/media
- Set
- Verify structure:
zfs list -o name,mountpoint

Expected output:
NAME               MOUNTPOINT
zfspool            /mnt/zfspool
zfspool/backups    /mnt/zfspool/backups
zfspool/documents  /mnt/zfspool/documents
zfspool/media      /mnt/zfspool/media
zfspool/projects   /mnt/zfspool/projects
3. Sharing the Parent Directory
3.1 Verify and Set SMB Protocol
- Check current SMB protocol:
testparm -s | grep 'protocol' - Set SMB to use only SMB3
- In the OMV web GUI, navigate to Services > SMB/CIFS > Advanced Settings.
- Set Minimum Protocol and Maximum Protocol to
SMB3. - Ensure Workgroup is enabled (for sharing on Windows)
3.2 Discovering and mounting pools for sharing
- In OMV Web GUI:
- Go to Storage > zfs > Pools.
- Select the “Discover” button on the top toolbar to mount the zfs directories for sharing.

3.3 Configure Shared Folders Sharing
- Navigate to the following:
- Go to Storage > Shared Folders.
- Create a shared folder with the following:
- Name:
zfspool_root - Absolute Path:
/mnt/zfspool_root - Relative Path (for root access):
/ - Administrator: read/write, Users: read/write, Others: read-only
- Name:
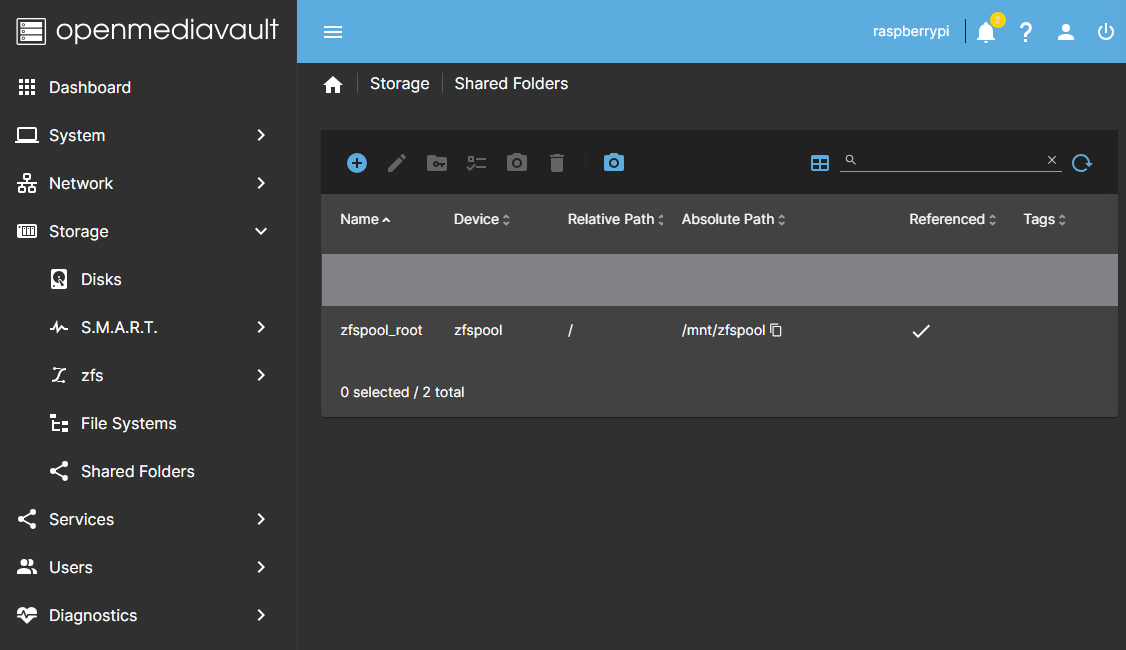
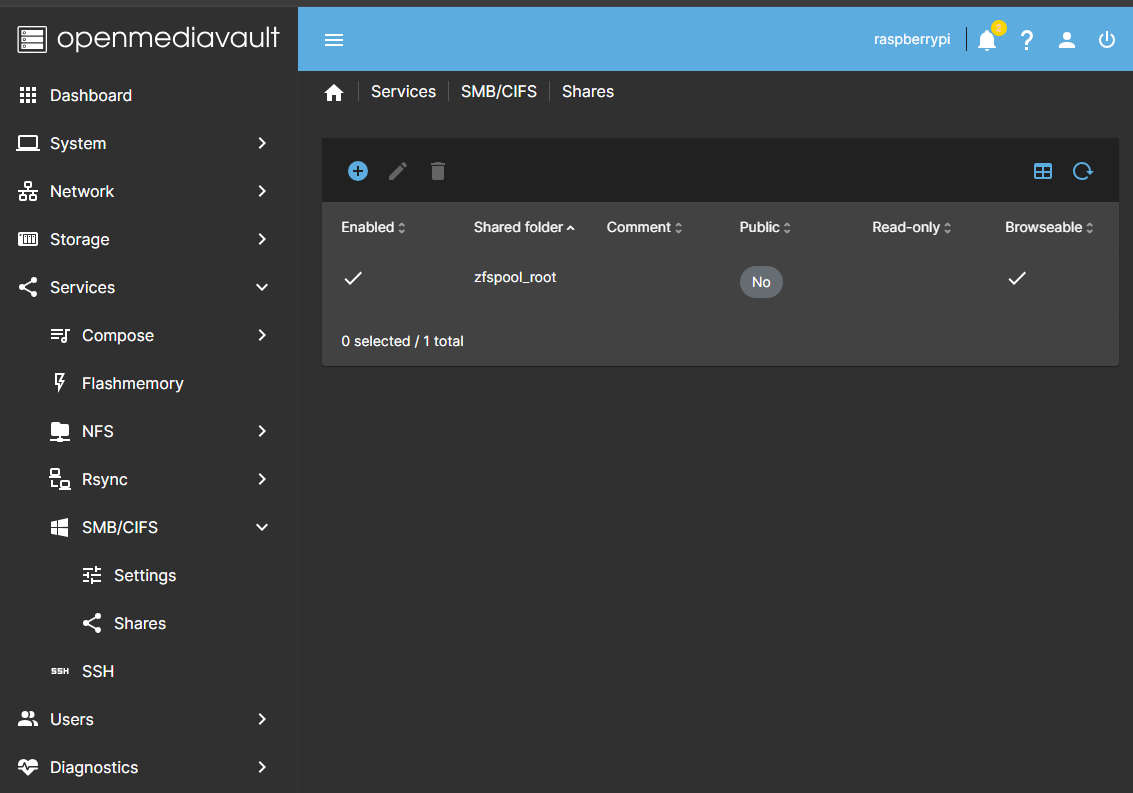
3.4 Configure SMB/CIFS Sharing
- Go to Services > SMB/CIFS > Shares.
- Add a new share:
- Select
zfspool_root. - Add the shared folder and enable Browsable.
- Select
- Apply changes.
3.5 Configure Permissions Settings
- Navigate to the following:
- Go to User Management> Users.
- Edit the user and verify login credentials:
- Re-enter password to ensure it is correct
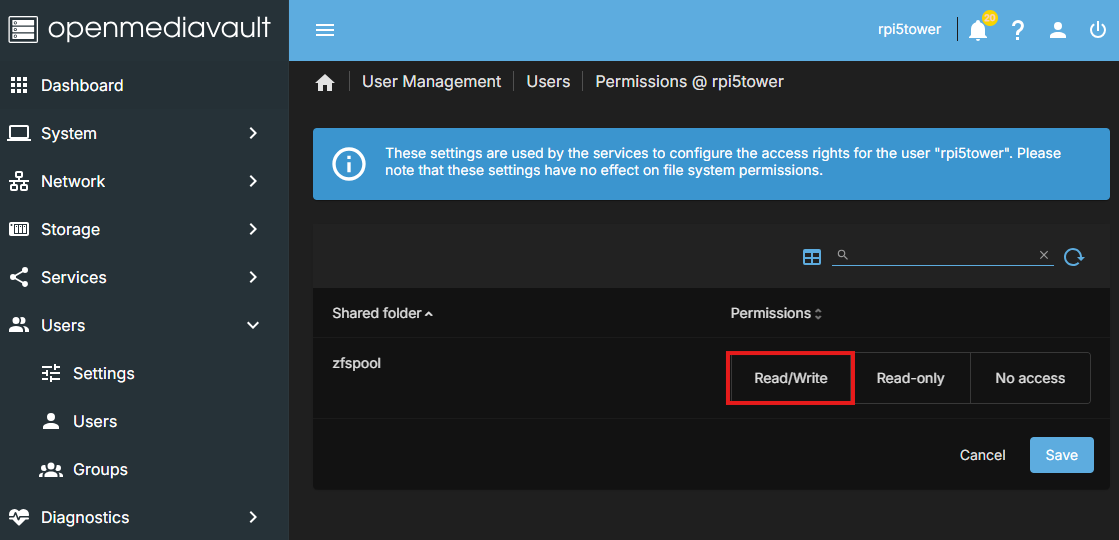
- Edit permissions for the user as:
zfspool_root: Read/Write

3.6 Map the Drive on Windows
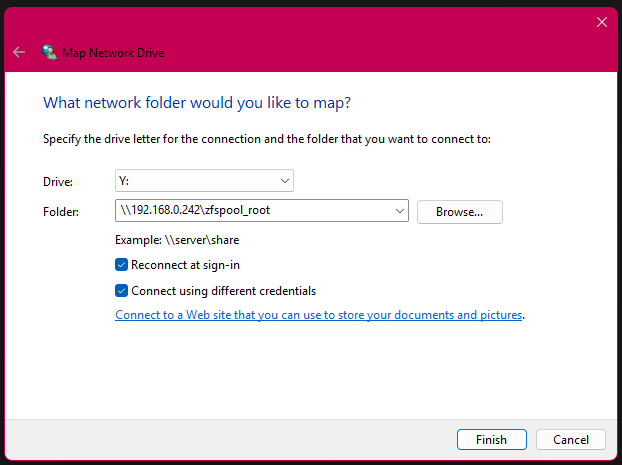
- Open File Explorer and click Map Network Drive.
- Enter the network path:
\<OMV_IP>\zfspool_root - Choose a drive letter and ensure Reconnect at sign-in is checked
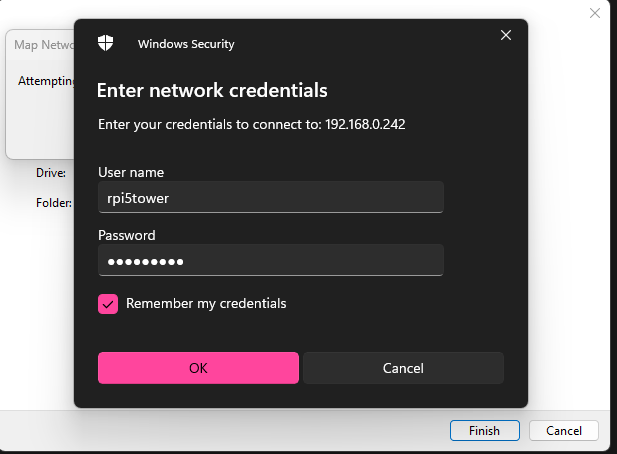
- Authenticate using your earlier verified credentials (from segment 3.5)
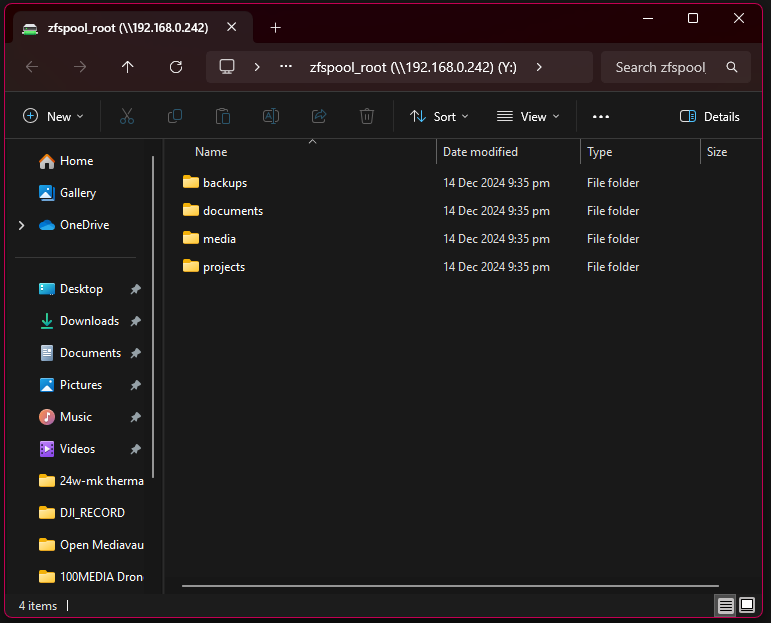
- Confirm that all sub-filesystems (
documents,media, etc.) are visible.
3.7 (Optional) User Access Rights
- Navigate to Access Rights Management > Users.
- Create a new user (e.g.,
nasadmin) and assign it to theusersgroup. - Go to Storage > Shared Folders and set the folder’s ACL to give this user full access.
3.8 (Optional) Accessing Subfolders Through a Single Share:
- This ensures that permissions set on
zfspool_rootpropagate correctly to all subdirectories:sudo chmod -R 775 /mnt/zfspool sudo chown -R nobody:users /mnt/zfspool - This ensures all subfolders are accessible and writable through the parent share.
- Understanding the combined effect of the commands :
chmod -Rchanges the permissions of files and directories recursively .- It ensures that the owner and group can fully interact with the files (read, write, and execute).Other users (e.g., accessing via SMB) can at least read and navigate directories and execute files (but not write).
chown -Rchanges the ownership of files and directories recursively.- By assigning ownership to
nobody:users, you align the ZFS filesystem with the SMB/CIFS service in OMV. - When a user accesses the share over SMB, OMV checks if they belong to the users group. If they do, they’ll get the permissions defined in the previous step (
775).
- By assigning ownership to
- Combined Effect:
- Ownership and Group Access:
- Files and directories are owned by
nobodyand accessible by anyone in theusersgroup.
- Files and directories are owned by
- Permissions:
- Full read, write, and execute access for the owner and group.
- Read and execute permissions for others (sufficient for file reading and directory navigation via SMB).
- Ownership and Group Access:
4. Quality-of-Life Customizations
4.1 Persistent Device Identifiers
- Export and re-import the pool using persistent identifiers:
(needs to be verified again)sudo zpool export zfspool sudo zpool import -d /dev/disk/by-id zfspool - Verify with:
sudo zpool status- Ensure device paths use
/dev/disk/by-id.
- Ensure device paths use
4.2 Configure ZFS TRIM & Scrub (cron)
- On a fresh ZFS setup, create a cron file so TRIM and scrub run automatically:
sudo nano /etc/cron.d/zfsutils-linux - Add the following lines for the trim (first Sunday of the month) and scrub (second Sunday of the month):
PATH=/usr/local/sbin:/usr/local/bin:/sbin:/bin:/usr/sbin:/usr/bin # TRIM the first Sunday of every month. 24 0 1-7 * * root if [ $(date +\%w) -eq 0 ] && [ -x /usr/lib/zfs-linux/trim ]; then /usr/lib/zfs-linux/trim; fi # Scrub the second Sunday of every month. 24 0 8-14 * * root if [ $(date +\%w) -eq 0 ] && [ -x /usr/lib/zfs-linux/scrub ]; then /usr/lib/zfs-linux/scrub; fi - Then fix permissions so cron will load the file correctly (cron is picky about this):
sudo chown root:root /etc/cron.d/zfsutils-linux
sudo chmod 644 /etc/cron.d/zfsutils-linux
4.3 Configure Degradation Alerts
- Install ZFS Event Daemon (ZED):
sudo apt install zfs-zed sudo systemctl enable zed sudo systemctl start zed - Configure email notifications:
sudo nano /etc/zfs/zed.d/zed.rc - Set (replace with your email):
ZED_EMAIL_ADDR="youremail@example.com"
4.4 Enable TRIM for NVMes
- Enable automatic TRIM:
Note:autotrim=onlets ZFS issue TRIM continuously as blocks are freed, while the earlier monthly/usr/lib/zfs-linux/trimcron job does a deeper sweep of all free space. Running both has negligible overhead and helps keep NVMe performance and wear-leveling healthy over the long term.sudo zpool set autotrim=on zfspool - Verify:
sudo zpool get autotrim

Expected Output:
NAME     PROPERTY  VALUE     SOURCE
zfspool  autotrim  on        local
4.5 Monitor System Performance
- Install
htopandnvme-cli:sudo apt install htop nvme-cli - Monitor CPU and drive performance:
htop sudo nvme smart-log /dev/nvme0
4.6 Optimize ARC Cache
- Check the current ARC cache size:
cat /sys/module/zfs/parameters/zfs_arc_max- The default size is dynamically set based on available RAM. For an 8 GB system, you can limit it to 4 GB:
echo $((4 * 1024 * 1024 * 1024)) | sudo tee /sys/module/zfs/parameters/zfs_arc_max
- The default size is dynamically set based on available RAM. For an 8 GB system, you can limit it to 4 GB:
- Make it persistent by adding:
sudo nano /etc/modprobe.d/zfs.conf

add line item and save:
options zfs zfs_arc_max=4294967296
5. Testing and Maintenance (needs to be verified)
- Test File Transfer Speeds:
- Transfer large files to ensure speeds are close to 90-110 MB/s (for gigabit networks).
- Simulate Pool Degradation:
- Remove a drive and monitor ZFS’s response.
- Replace the drive using:
sudo zpool replace zfspool <FAULTED_DEVICE> <NEW_DEVICE>
- Monitor Pool Health:
sudo zpool status - Inspect Disk States:
sudo nvme list
6. Summary
This guide covers the end-to-end setup of a Raspberry Pi 5 Nvme NAS with OMV and ZFS, including:
- Creating a parent directory and sub-filesystem structure.
- Configuring ZFS features like compression, recordsize, and atime.
- Mapping the parent directory to a Windows device for seamless access.
- Implementing quality-of-life improvements like TRIM, scrubbing, and degradation alerts.
- Providing detailed maintenance instructions to ensure system health over time.