Fixing Sipeed NanoKVM Pro HDMI Capture Issues on Ubuntu
This guide shows the Sipeed NanoKVM Pro Ubuntu HDMI capture fix I used to resolve blank web preview, wrong negotiated resolutions, and heavy artifacting.
If you’re using a Sipeed NanoKVM Pro with Ubuntu and an Intel iGPU (on a Radxa X4), you may encounter a frustrating issue specifically with a HDMI-passthrough setup whereby:
- HDMI passthrough works
- The NanoKVM mini preview (1.47″ screen) shows the desktop
- But the web UI video is blank, corrupted, or mis-scaled
- Ultrawide resolutions (e.g. 3440×1440) are detected incorrectly
- Colors look washed out or suddenly “snap” to high contrast
This guide explains why this happens, how to identify the root cause, and the exact fix — no EDID hacks, kernel patches, or cable swaps required.
❗ Problem Symptoms
On Ubuntu 24.04 with Intel Alder Lake-N on the Radxa X4 in my case, (i915 driver), NanoKVM Pro users may see:
- Incorrect input resolutions reported by NanoKVM’s built in KVM-HUD:
3440×1440 → 5160×14401920×1080 → 2880×1080
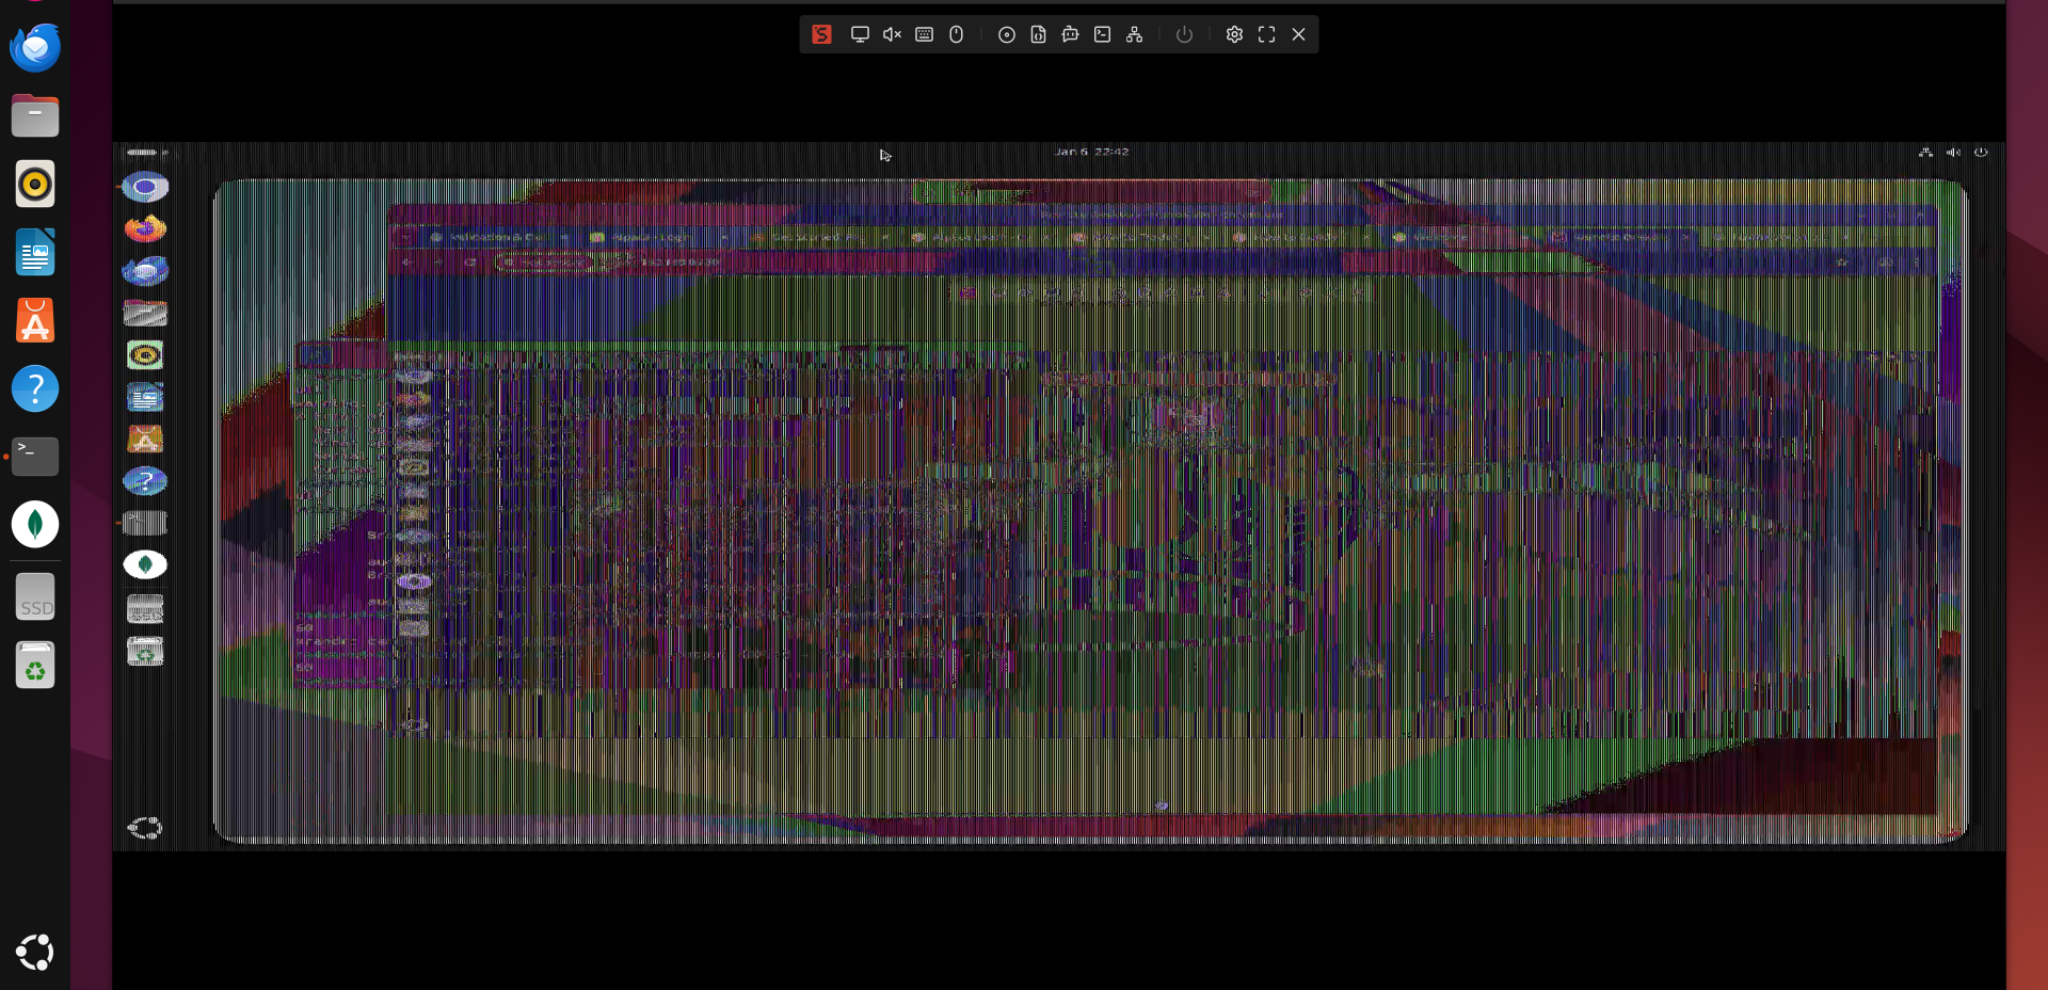
- Blank or heavily corrupted web UI capture (ie. Artifacting)
- HDMI passthrough to the monitor works normally
- NanoKVM’s built-in HDMI preview works, but browser view does not
- Subtle washed-out colors that suddenly change after running
xrandr - Same hardware works perfectly on Windows
Rolling NanoKVM firmware forward or backward alone does not reliably fix the issue. Flashing of the NanoKVM-Pro Firmware to 1.09 (base) + 1.2.2 (app) did not solve the issue and it had persisted on the updated 1.2.8 and 1.2.9-early-release app as well. Using common negotiation resolutions like 1920×1080 60Hz did not resolve the issue reliably (with passthrough).
🔍 Root Cause (What’s Really Happening)
This is not a firmware bug, EDID corruption, power issue, or bad HDMI cable.
The real issue is HDMI signal format negotiation.
On Ubuntu, Intel’s i915 driver may output:
- 10–12 bit color depth
- YCbCr or HDR-related colorspaces
- Dynamic RGB range (Limited vs Full)
These formats are valid for monitors, but are embedded HDMI capture pipelines (like NanoKVM’s encoder) may misinterpret them, which ends up resulting in:
- Incorrect pixel stride
- Fake “wide” resolutions
- Broken or blank web streams
- Color distortion
This explains why:
- Passthrough works but capture fails
- Mini preview works but web UI doesn’t
- Windows behaves correctly (more conservative defaults)
✅ The Solution
(NanoKVM Pro Ubuntu HDMI capture fix)
Force Ubuntu to output a simple, capture-safe HDMI signal.
Step 1: Identify the active NanoKVM Pro Ubuntu capture output
xrandr | grep " connected"
Example output:
HDMI-2 connected primary
⚠️ Apply settings only to the connected output.
Step 2: Force safe HDMI signal parameters
xrandr --output HDMI-2 --set "Broadcast RGB" "Full"
xrandr --output HDMI-2 --set "max bpc" 8
xrandr --output HDMI-2 --set "Colorspace" "Default"
What this does:
- Forces RGB Full (no YCbCr ambiguity)
- Locks color depth to 8-bit (safe for capture)
- Disables advanced colorspace negotiation
Step 3: Set your target resolution
xrandr --output HDMI-2 --mode 3440x1440 --rate 60
Step 4 (Optional): Verify at DRM/kernel level
sudo apt install libdrm-tests
modetest -c | sed -n '/HDMI-A-2/,+40p'
Confirm:
Broadcast RGB: Fullmax bpc: 8Colorspace: Default- Correct modes listed (3440×1440@60)
This confirms the fix is real, not cosmetic.
🎉 Final Result
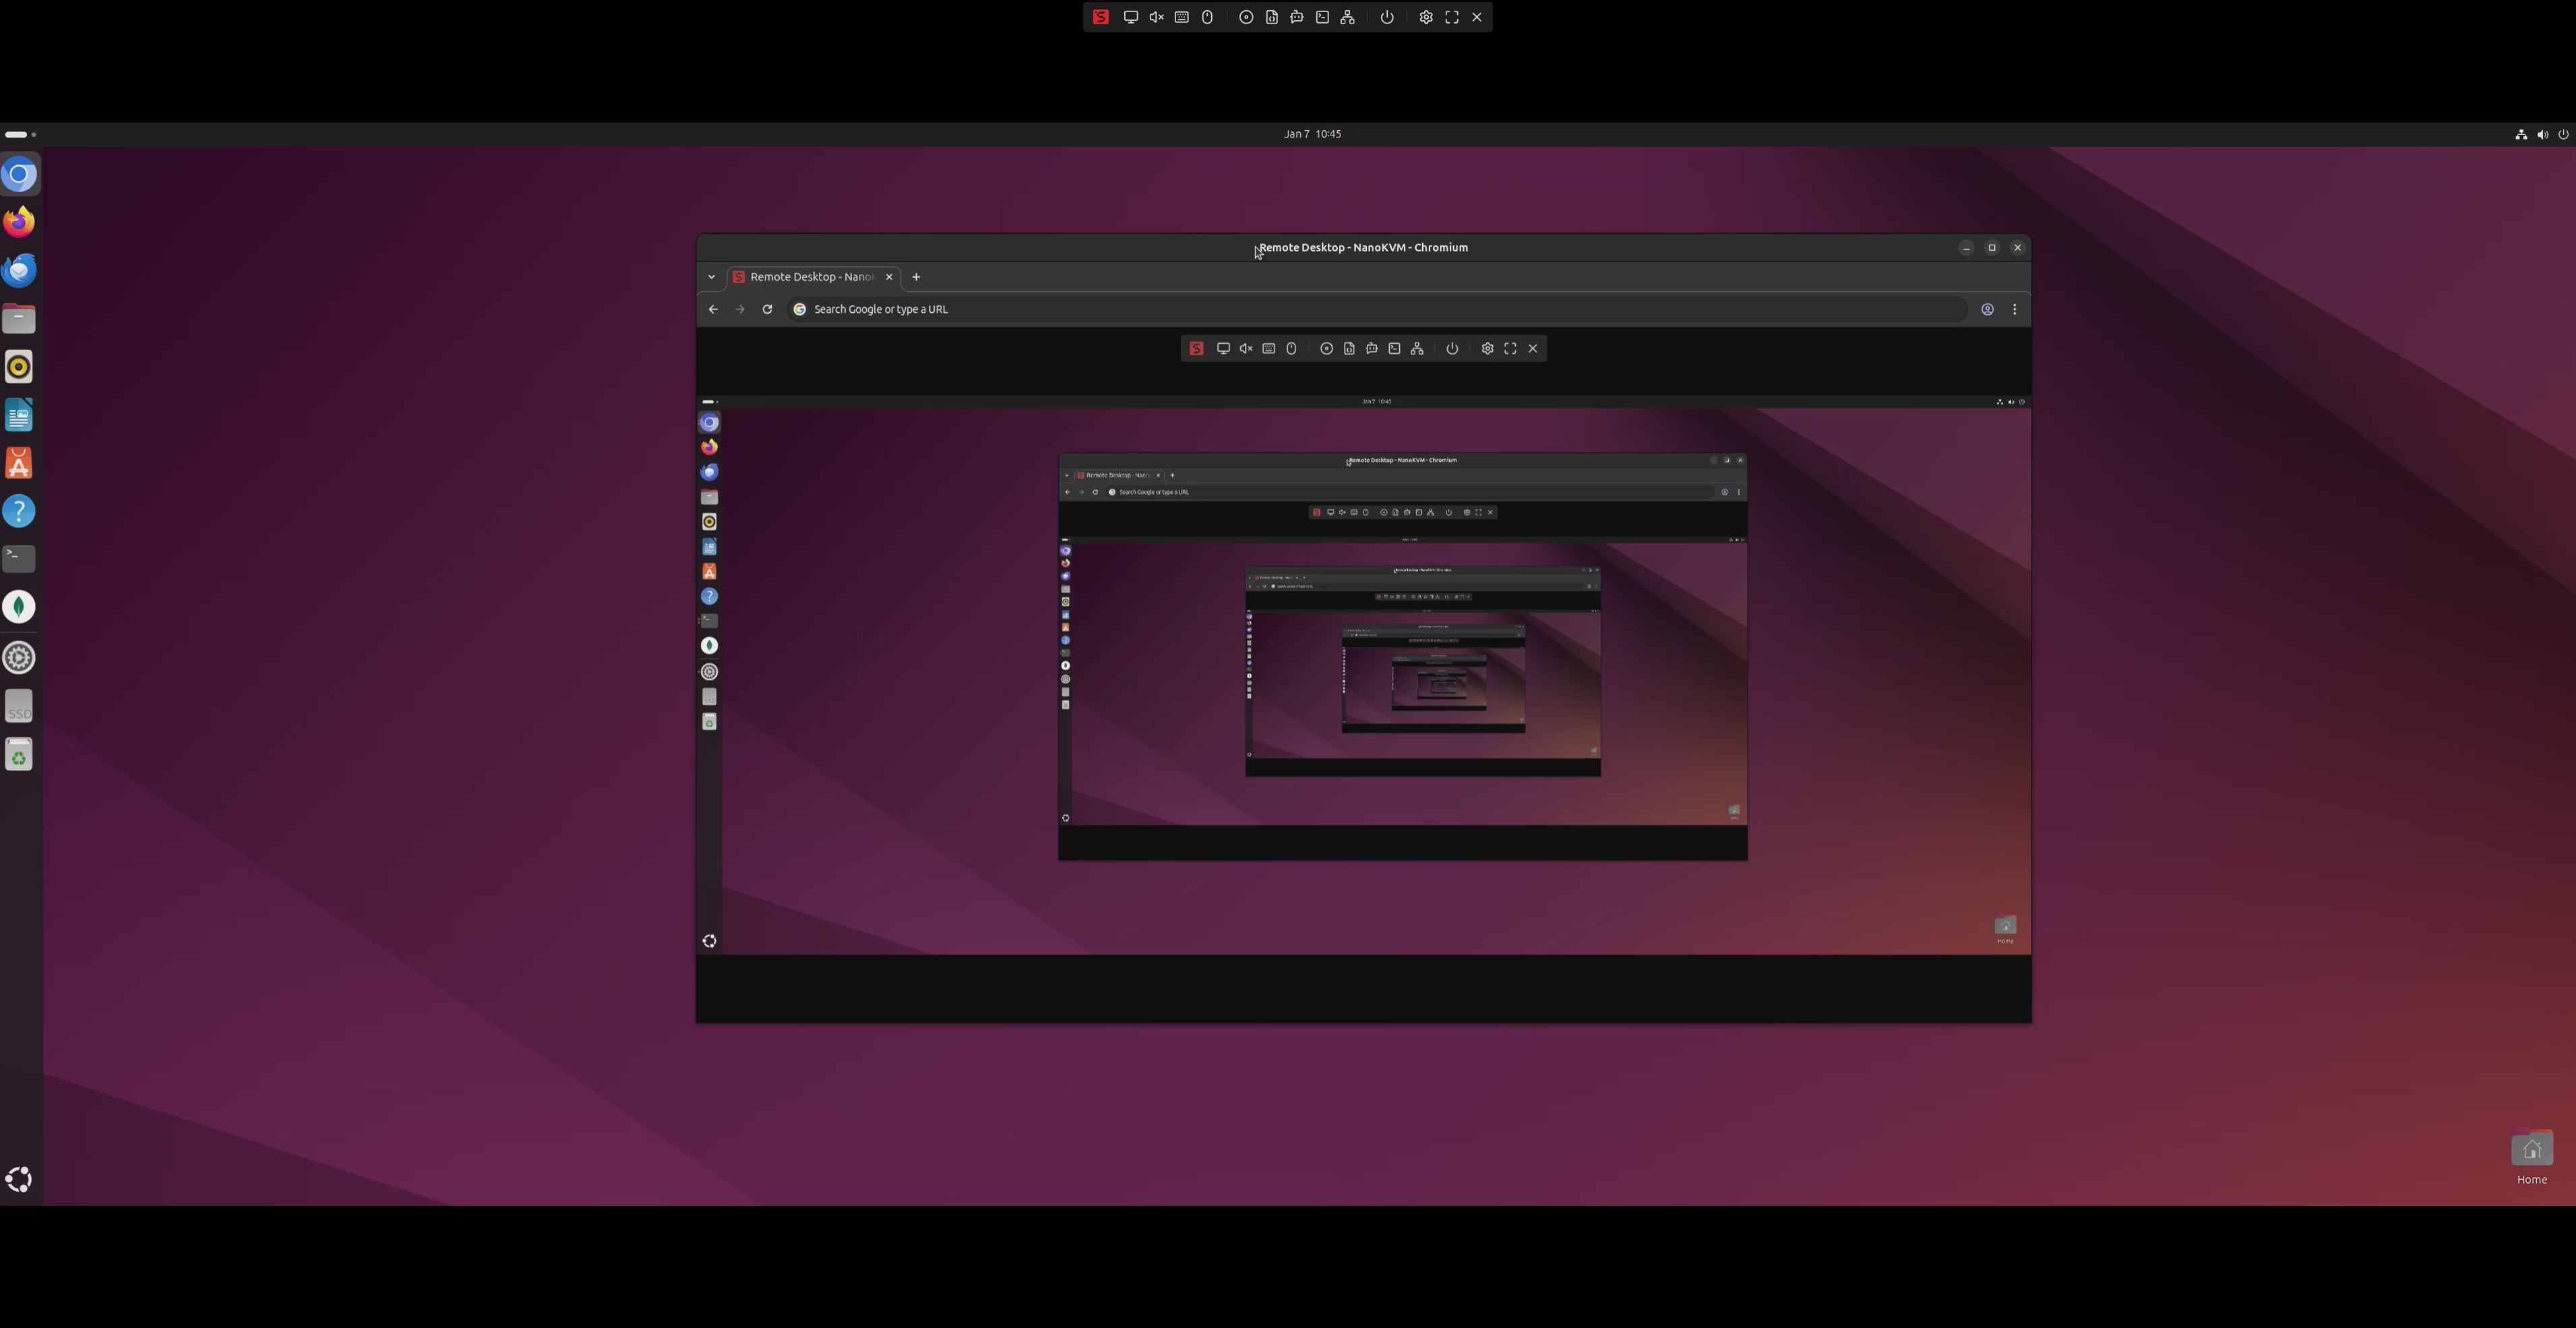
After applying the above:
- NanoKVM correctly detects 3440×1440
- HDMI passthrough works
- Web UI capture works
- No artifacting
- No washed-out colors
- NanoKVM Pro firmware 1.2.8 works correctly
No EDID overrides. Avoid kernel tweaks. Skip testing hardware changes.
💡 Why this NanoKVM ubuntu capture fix works
Monitors are forgiving.
Capture devices are not.
By forcing a standards-safe HDMI output, Ubuntu stops sending formats that confuse the NanoKVM capture encoder — fixing all symptoms at once.
🔁 Recommendation
Make these xrandr commands persistent (e.g. via a login script or systemd user service) if you run headless or reboot often.
🏁 Conclusion
If you’re using Ubuntu + Intel iGPU + NanoKVM Pro:
Never rely on HDMI “Auto” when capture hardware is involved.
By explicitly controlling color depth and colorspace accordingly, this would be the difference between a broken web UI and a rock-solid IP-KVM setup.
Once you have resolved the display issues, you can even consider setting up Zerotier and TailScale on the NanoKVM Pro for global secure remote access. See our helpful Zerotier Guide!
Helpful Sipeed Links:
Sipeed Nano Kvm Wiki
NanoKVM Pro Github Issue Page
NanoKVM Pro Discussion Forum